Pop quiz: When was the last time you thought about your attic insulation? If you're like most homeowners, the answer is probably "never" or "when I was house hunting and the inspector mentioned it." But here's the thing—your attic insulation is one of the hardest-working components of your home, and if you don't have enough of it, you're literally watching your money float up and out of your roof.
In North Carolina, where we experience sweltering summers and chilly winters (sometimes in the same week, it seems), having adequate attic insulation isn't just a nice-to-have—it's essential for keeping your home comfortable and your energy bills reasonable. Let's dive into how you can tell if your attic is properly insulated or if it needs some TLC.
The Magic Number: Understanding R-Values
Before we grab a ladder and head up to your attic, let's talk about R-values. No, it's not a secret code or a new math concept designed to make you feel old. R-value simply measures how well insulation resists heat flow—the higher the number, the better the insulation performs.
For North Carolina homes, the U.S. Department of Energy recommends:
- Southern NC (Climate Zone 3): At least R-38 in your attic
- Northern NC (Climate Zone 4): R-49 or higher is recommended
If you're in the Triad area—Greensboro, Winston-Salem, or High Point—you're right on that border between zones, so aiming for R-49 is your best bet for optimal energy efficiency.
What Does That Look Like in Real Life?
Here's where it gets practical. R-38 translates to approximately:
- 12-15 inches of fiberglass batt insulation
- 10-14 inches of blown-in cellulose insulation
- 9-12 inches of blown-in fiberglass
For R-49, you're looking at:
- 15-20 inches of fiberglass batt insulation
- 13-17 inches of blown-in cellulose insulation
- 11-15 inches of blown-in fiberglass
If those numbers seem like a lot, they are! But that's exactly the point—it takes significant insulation to properly protect your home from North Carolina's temperature swings.
DIY Inspection: How to Check Your Attic Insulation
Ready to play home inspector? Great! Here's how to assess your attic insulation situation. Fair warning: you'll need to actually venture into your attic, which might be a bit dusty and definitely involves climbing a ladder. If heights aren't your thing or you're not comfortable in tight spaces, feel free to skip ahead to the "Call a Professional" section—we won't judge.
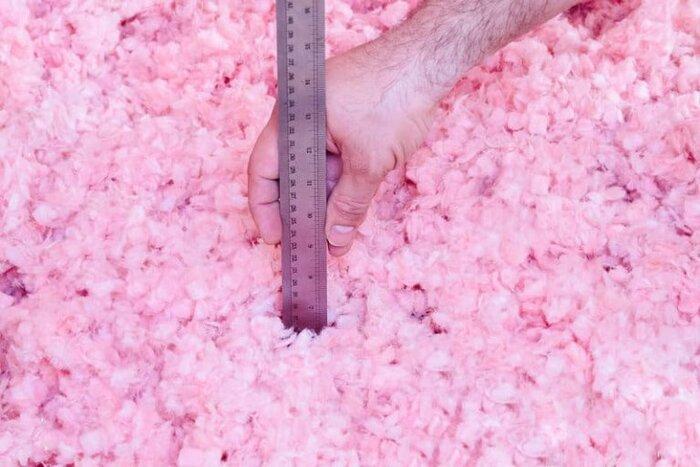
The Simple Ruler Test
This is the easiest way to check if you have enough insulation:
- Safety first: Make sure your attic has proper lighting, wear old clothes, gloves, and a dust mask (insulation fibers are itchy!)
- Locate your floor joists: These are the horizontal beams that run across your attic floor
- Measure: Using a ruler or measuring tape, check the depth of your insulation from the attic floor to the top of the insulation
- Compare: If you have less than 11 inches, you definitely need more. Even if you have 11-13 inches, you're probably in the "could use more" category for optimal performance
The Joist Visibility Test
Here's an even simpler check: Can you see your floor joists? If your attic floor joists are visible and the insulation is level with or below them, you need more insulation. Period. End of story.
Most floor joists are 6-7 inches tall. If they're completely filled with insulation, you're only at about R-21—roughly half of what you need for a North Carolina home. Your attic insulation should cover those joists like a warm, fluffy blanket.
Signs Your Attic Needs More Insulation (No Ladder Required)
Not everyone wants to climb into their attic, and that's perfectly fine. Here are some telltale signs your attic insulation is inadequate—observable from the comfort of your living space:
1. Your Energy Bills Are Sky-High
If your utility bills seem unreasonably high, especially during summer and winter, your attic might be the culprit. Insufficient insulation means your HVAC system has to work overtime to maintain comfortable temperatures. It's like trying to fill a bathtub with the drain open—technically possible, but wasteful and expensive.
2. Rooms Are Unevenly Heated or Cooled
Does your second floor feel like a sauna in summer and an icebox in winter? That's a classic sign of inadequate attic insulation. Heat rises (thanks, physics!), and without proper insulation, your top floor becomes ground zero for temperature extremes.
3. Your Roof Has Ice Dams in Winter
Okay, this is more rare in North Carolina, but if you do get ice dams during our occasional winter weather, it's a sign that heat is escaping through your roof, melting snow that then refreezes at the edges. Poor attic insulation is usually the culprit.
4. Your Attic Feels Like a Furnace in Summer
Here's a little test: On a hot summer day, open your attic access. If you're hit with a wave of air that could rival a pizza oven, you've got an insulation problem. While attics will always be warm in summer, they shouldn't be dramatically hotter than the outdoor temperature.
5. Your Ceiling Feels Cold in Winter or Hot in Summer
Touch your ceiling. Seriously, go ahead—we'll wait. If it feels noticeably cooler than room temperature in winter or warmer in summer, heat is transferring right through your attic. Proper insulation acts as a thermal barrier preventing this temperature transfer.
Special Concerns for Older Homes
If you live in an older home—particularly one built before 1980—chances are your attic insulation is woefully inadequate. Back then, building codes typically required only R-15 to R-19 in attics, which translates to a measly 4-5 inches of insulation. By today's standards, that's barely better than nothing.
The good news? Adding insulation to an older home is one of the best investments you can make. It's like giving your house a warm winter coat that also works as a cooling vest in summer. Plus, modern insulation materials and installation techniques are far superior to what was available decades ago.
What Type of Insulation Do You Have?
Different insulation types have different R-values per inch, which matters when you're assessing whether you have enough. Here are the most common types you'll find in North Carolina attics:
- Fiberglass batts: Those pink or yellow rolls or sheets, typically R-3 to R-4 per inch
- Blown-in fiberglass: Loose, fluffy material, about R-2.5 per inch
- Blown-in cellulose: Grayish, paper-based material, approximately R-3.5 per inch
- Spray foam: Less common in attics, but provides R-6 to R-7 per inch (closed-cell)
Knowing what type you have helps you understand how much you need. For example, if you have blown-in fiberglass, you'll need more inches to achieve the same R-value as cellulose.
When Insulation Needs Replacement, Not Just Addition
Sometimes it's not about adding more insulation—sometimes the existing insulation needs to go. Here's when replacement is necessary:
- Water damage: Wet insulation loses its R-value and can harbor mold. If you see water stains or damp insulation, it needs to be replaced.
- Pest infestation: If critters have been using your insulation as a bathroom or nesting site, it's time for new insulation.
- Severe compression: Over time, insulation can compress and lose effectiveness. If it looks packed down or thin, replacement might be better than adding on top.
- Vermiculite: This older insulation type may contain asbestos and should be professionally removed.
The Bigger Picture: Insulation + Air Sealing
Here's something important that most homeowners don't realize: insulation only works at its rated R-value when it's also paired with proper air sealing. You can have 20 inches of insulation in your attic, but if there are air leaks around pipes, wires, ductwork, and light fixtures, air is flowing freely between your living space and attic.
Think of it this way: insulation is like wearing a warm jacket, but air leaks are like leaving the jacket unzipped. You need both proper insulation AND air sealing for maximum effectiveness and energy efficiency.
What to Do If You Don't Have Enough
If you've determined that your attic insulation is lacking, you have options:
DIY Approach
Adding blown-in insulation on top of existing insulation can be a DIY project if you're handy and comfortable in your attic. However, make sure to:
- Air seal before adding insulation
- Ensure proper attic ventilation
- Cover all areas evenly
- Avoid covering recessed lighting or soffit vents
- Wear proper safety equipment
Professional Installation
For most homeowners, professional installation is the way to go. At 4 Seasons Insulation, we not only add the right amount and type of insulation for your specific home but also:
- Identify and seal air leaks
- Check for and address any moisture issues
- Ensure proper ventilation
- Work around obstacles like wiring and ductwork safely
- Guarantee even coverage and the proper R-value
Plus, we can spot potential problems (like roof leaks or insufficient ventilation) that an untrained eye might miss.
The Bottom Line: Is Your Attic Up to Snuff?
Your attic insulation is one of those "set it and forget it" home components—until it's not doing its job, and then you definitely notice (usually in the form of uncomfortable rooms and high energy bills). The good news is that checking your insulation level is relatively simple, and adding insulation is one of the most cost-effective home improvements you can make.
If you're in the Greensboro, Winston-Salem, or High Point area and want a professional assessment of your attic insulation, we're here to help. We'll measure your current insulation, check for any issues, and give you honest recommendations about whether you need to add insulation, replace it, or if you're already sitting pretty.
Ready to find out if your attic insulation makes the grade? Contact us for a free attic inspection. Because life's too short to wonder why your energy bills are so high when the answer might be right above your head.